Regular roof inspections are the single most effective way to prevent leaks, water damage, and expensive repairs. The problem is that many RV owners either skip inspections entirely or don’t know what to look for.
This step-by-step guide shows you how to inspect your RV roof properly, even if you’ve never done it before.
Why RV Roof Inspections Matter
RV roof damage almost always starts small:
-
Hairline cracks
-
Loose sealant
-
Minor seam separation
If caught early, these issues are inexpensive and easy to fix. If ignored, they often lead to hidden water damage, soft spots, and interior repairs.
Related reading:
Signs of Hidden RV Roof Water Damage
How Often You Should Inspect Your RV Roof
At a minimum:
-
Twice per year (spring and fall)
Additional inspections are recommended:
-
After severe storms
-
After long trips
-
Before winter storage
-
Before extended travel
Your climate also plays a role.
Related guide:
RV Roof Maintenance Schedule by Climate
What You’ll Need Before You Start
-
Ladder rated for your RV height
-
Non-slip shoes
-
Flashlight
-
Clean rags or paper towels
-
Camera or phone for photos
Optional:
-
Painter’s tape for marking areas
-
Mild cleaner for dirty sections
Step 1: Inspect the Roof from the Ground
Before climbing up, walk around your RV and look at:
-
Roof edges
-
Trim and molding
-
Signs of sagging
-
Streaks or stains running down the sides
These clues often point to roof problems before you ever step on top.
Step 2: Safely Access the Roof
Only step onto the roof if:
-
Your RV roof is rated for foot traffic
-
The surface is dry
-
You feel stable and comfortable
If unsure, inspect from a ladder or use binoculars.
Safety always comes first.
Step 3: Check the Overall Roof Surface
Once on the roof, scan the entire surface slowly.
Look for:
-
Cracks or splits
-
Bubbling or blistering
-
Discoloration
-
Soft or spongy areas underfoot
Soft spots may indicate moisture damage beneath the surface.
Related reading:
What Causes RV Roof Bubbles and Blisters?
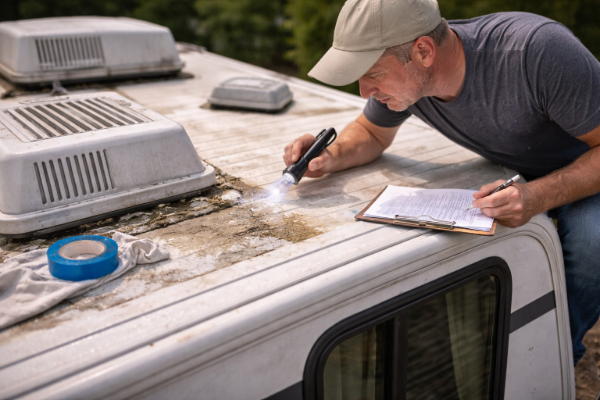
Step 4: Inspect All Seams and Edges
Roof seams are one of the most common leak points.
Carefully inspect:
-
Front and rear seams
-
Side edges
-
Areas where the roof meets the trim
Sealant should be smooth, flexible, and fully bonded. Cracked, lifting, or brittle sealant needs attention.
Step 5: Inspect Roof Fixtures and Penetrations
Spend extra time around anything that passes through the roof:
-
Vents
-
Skylights
-
AC units
-
Antennas
-
Solar mounts
These areas experience movement and vibration, making them high-risk leak zones.
Step 6: Check the Roof Feel Underfoot
As you move around, pay attention to how the roof feels:
-
Even and firm is good
-
Spongy or uneven is a warning sign
If you find a soft area, mark it and inspect the interior below later.
Step 7: Inspect the Interior Ceiling and Upper Walls
After inspecting the roof, go inside and check:
-
Ceiling panels
-
Upper cabinets
-
Corners and trim
Look for:
-
Stains
-
Soft spots
-
Musty odors
-
Warping or bubbling materials
Interior signs often confirm exterior issues.
Step 8: Document What You Find
Take photos and notes of:
-
Cracked sealant
-
Suspect seams
-
Soft spots
-
Discoloration
This helps track changes over time and plan repairs.
Step 9: Perform a Leak Test if Needed
If you suspect a leak but can’t see obvious damage, a controlled water test can help.
Related guide:
How to Test an RV Roof for Leaks Using the Hose Method
Common Inspection Mistakes to Avoid
-
Rushing through the inspection
-
Only checking obvious areas
-
Ignoring small cracks
-
Skipping interior inspection
-
Assuming no leaks means no damage
Slow, methodical inspections catch problems early.
Final Thoughts
Inspecting your RV roof doesn’t require special tools or professional experience. What it does require is consistency and attention to detail.
A proper inspection routine can:
-
Prevent leaks
-
Extend roof lifespan
-
Protect your RV’s interior
-
Save thousands in repairs
A few careful inspections each year make all the difference.