Most RV roof leaks come from the same handful of locations, regardless of RV brand or age. Knowing where to look first can save hours of frustration and prevent unnecessary repairs.
This guide breaks down the most common RV roof leak locations, explains why they fail, and shows you how to fix them correctly.
Why RV Roof Leaks Happen in Predictable Places
RV roofs flex, vibrate, and expand as you drive. Water almost always enters where:
-
Materials meet
-
Sealant is used
-
Movement is constant
That’s why leaks tend to repeat in the same areas.
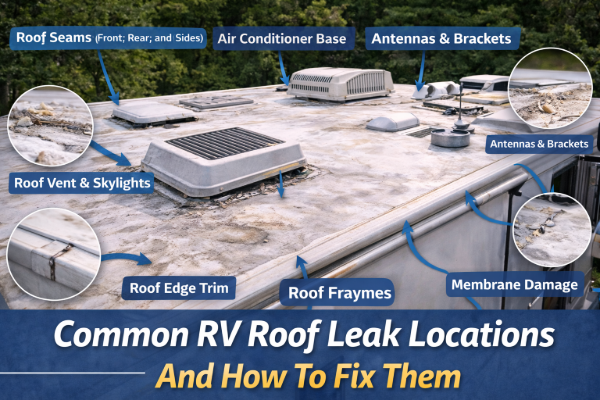
1. Roof Seams (Front, Rear, and Side Seams)
Why They Leak
Roof seams are long, exposed joints that take the brunt of:
-
Wind-driven rain
-
UV exposure
-
Roof flexing while driving
Sealant at seams often cracks or pulls away over time.
How to Fix It
-
Remove loose or cracked sealant
-
Clean and dry the seam thoroughly
-
Apply compatible RV lap sealant or seam tape
-
Allow proper curing time
Avoid layering sealant over failed material.
2. Roof Vents and Skylights
Why They Leak
Vents and skylights are cut-through openings sealed only by sealant. Heat, sun, and vibration cause sealant to shrink and split.
How to Fix It
-
Inspect the entire perimeter
-
Replace cracked or brittle sealant
-
Use self-leveling sealant for horizontal surfaces
-
Ensure full coverage around mounting screws
Sealant compatibility matters:
Best Sealants for RV Roof Types
3. Air Conditioner Base Gaskets
Why They Leak
AC units sit on a foam gasket that compresses over time. When compression weakens, water can sneak underneath.
How to Fix It
-
Check mounting bolt tension
-
Inspect the gasket for compression loss
-
Replace the gasket if water intrusion persists
Over-tightening bolts can cause damage.
4. Roof Edge Trim and Corner Joints
Why They Leak
Roof edges are where the roof meets the sidewalls. These areas experience constant movement and often rely on both sealant and trim screws.
How to Fix It
-
Inspect trim screws for looseness
-
Replace dried or cracked sealant
-
Re-bed trim using butyl tape if needed
-
Seal over fasteners with non-sag sealant
Edge leaks often cause water to travel far inside.
5. Antennas, Solar Mounts, and Accessories
Why They Leak
Anything bolted to the roof creates multiple penetration points. Improper installation or aging sealant allows water in.
How to Fix It
-
Inspect each mounting point
-
Reseal around bolts and brackets
-
Ensure sealant fully encapsulates hardware
These leaks are often small but persistent.
6. Ladder Mounts and Rear Wall Attachments
Why They Leak
Ladder mounts are attached through the rear wall and roof edge, making them a common water entry point.
How to Fix It
-
Remove and inspect mounting screws
-
Reinstall with fresh sealant or butyl tape
-
Seal over fasteners completely
Water entering here often shows up far from the ladder.
7. Roof Membrane Damage (Cracks, Punctures, Bubbles)
Why They Leak
Physical damage, UV exposure, or trapped moisture can cause:
-
Cracks
-
Blisters
-
Small punctures
These issues may not leak immediately but worsen over time.
How to Fix It
-
Clean and dry the damaged area
-
Use repair tape or patch kits designed for your roof type
-
Monitor closely after repair
Related reading:
What Causes RV Roof Bubbles and Blisters?
How to Confirm the Leak Location
If multiple areas look suspicious, don’t guess.
Use a controlled water test to confirm:
-
Start low and work upward
-
Test one section at a time
-
Watch for delayed leaks
Step-by-step guide:
How to Test an RV Roof for Leaks Using the Hose Method
What If Multiple Leak Locations Exist?
It’s common to find more than one problem area, especially on older RVs.
In that case:
-
Fix one area at a time
-
Retest after each repair
-
Avoid resealing everything blindly
Diagnosis guide:
How to Diagnose RV Roof Leaks
When to Consider Professional Help
Seek professional help if you find:
-
Large soft or sagging areas
-
Repeated leaks after repairs
-
Extensive water damage
Decision guide:
DIY RV Roof Repair vs Hiring a Professional: What’s Worth It?
Final Thoughts
Most RV roof leaks are predictable, preventable, and repairable — if you know where to look.
Regular inspections and early repairs at these common leak locations can prevent major damage and extend your roof’s lifespan by years.