Before you clean, reseal, coat, or repair your RV roof, there’s one critical thing you must know: what type of RV roof you have.
Using the wrong cleaner, sealant, or repair method can damage your roof and shorten its lifespan. This guide walks you through how to identify your what type of RV roof type step by step, even if you have no prior experience.
Why Identifying Your RV Roof Type Matters
Different RV roof materials react differently to:
-
Cleaners
-
Sealants
-
Adhesives
-
Sun and weather exposure
For example, some rubber roofs can be permanently damaged by petroleum-based products, while others require specific sealants to prevent peeling or blistering.
Related reading:
Common RV Roof Repair Mistakes to Avoid
The Most Common Types of RV Roof
Most RVs use one of the following roof materials:
-
EPDM rubber
-
TPO rubber
-
Fiberglass
-
Aluminum
Each has distinct visual and physical characteristics.
Step 1: Check Your RV Documentation
The fastest way to identify your roof type is by checking:
-
Owner’s manual
-
Manufacturer’s website
-
Original sales paperwork
Roof type is often listed under specifications.
If documentation isn’t available, move on to physical inspection.
Step 2: Inspect the Roof Surface Appearance
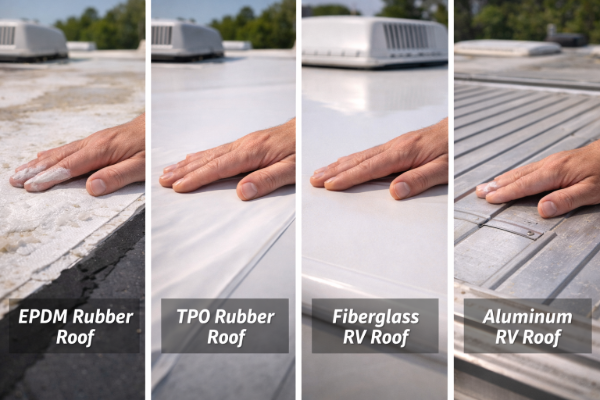
EPDM Rubber Roof (Most Common)
EPDM roofs are:
-
Black underneath, white on top
-
Slightly chalky when rubbed
-
Soft and flexible
A simple test: rub the surface with a cloth. If you see white residue, it’s likely EPDM.
EPDM roofs are prone to UV breakdown and require regular maintenance.
Related guide:
RV Roof Maintenance Schedule by Climate
TPO Rubber Roof
TPO roofs are:
-
Bright white or light gray
-
Smooth and slightly glossy
-
No chalky residue when rubbed
TPO is more UV-resistant than EPDM but still requires compatible sealants.
Fiberglass RV Roof
Fiberglass roofs are:
-
Hard and rigid
-
Smooth with a glossy finish
-
Often molded or seamless
They feel solid underfoot and do not flex like rubber roofs. Fiberglass is durable but can crack if neglected.
Aluminum RV Roof
Aluminum roofs are:
-
Metallic or painted metal panels
-
Often ribbed or paneled
-
Extremely durable
You’ll usually see seams running across the roof where panels overlap.
Step 3: Check How the Roof Feels Underfoot
Carefully walk the roof (only if it’s rated for foot traffic).
-
Soft and flexible → EPDM or TPO
-
Firm but smooth → Fiberglass
-
Hard and metallic → Aluminum
Soft spots may indicate water damage rather than roof type.
Related reading:
Signs of Hidden RV Roof Water Damage
Step 4: Inspect Seams and Edges
Look closely at:
-
Roof edges
-
Vents
-
Skylights
-
AC units
Rubber roofs usually have self-leveling sealant around fixtures. Aluminum roofs show metal seams, while fiberglass roofs may have fewer visible seams.
Step 5: Look at the Roof from the Side
From ground level, observe:
-
Roof thickness
-
Edge trim
-
Overhang material
Rubber roofs usually wrap over the edge slightly and are secured with trim and sealant.
Common Mistakes When Identifying RV Roof Types
-
Assuming all white roofs are the same
-
Confusing TPO with EPDM
-
Ignoring the underside color
-
Using cleaners before confirming roof material
Using the wrong products can cause bubbling, peeling, or adhesive failure.
Related article:
What Causes RV Roof Bubbles and Blisters?
What to Do Once You Know Your RV Roof Type
Once identified, you can:
-
Choose the correct cleaner
-
Use compatible sealants
-
Follow the proper maintenance schedule
-
Avoid costly repair mistakes
Knowing your roof type is the foundation of proper RV roof care.
Final Thoughts
Identifying your RV roof type doesn’t require special tools or professional training. A careful inspection and understanding of key differences is usually enough.
Taking a few minutes to confirm your roof material can prevent major repair issues down the road and help you maintain your RV properly.