Diagnosing an RV roof leak isn’t always straightforward. Water can enter in one location, travel through insulation or framing, and show up somewhere completely different inside the RV.
This guide explains how to diagnose RV roof leaks step by step, so you can find the true source of the problem instead of guessing or sealing the wrong area.
Why RV Roof Leaks Are Hard to Find
RV roofs are layered systems. Water can:
-
Travel sideways under the roof membrane
-
Run along framing or wiring
-
Pool in insulation before becoming visible
That’s why many leaks appear far from the actual entry point.
Related reading:
Signs of Hidden RV Roof Water Damage
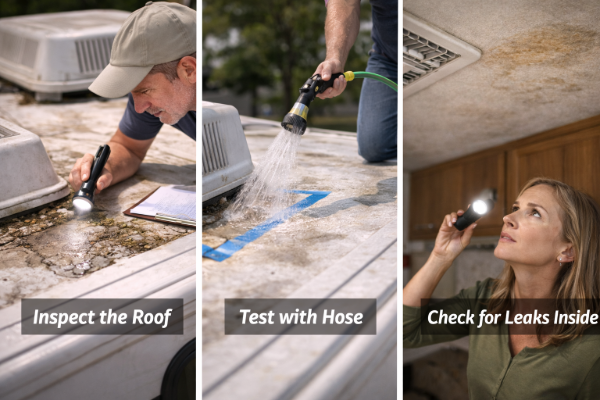
Step 1: Identify Interior Leak Symptoms First
Start inside the RV. Interior clues help narrow down where to focus on the roof.
Look for:
-
Ceiling stains or discoloration
-
Soft ceiling panels
-
Musty or moldy odors
-
Damp upper cabinets or wall corners
Mark the general area where symptoms appear.
Step 2: Inspect the Roof Directly Above (and Beyond)
Water doesn’t always drip straight down. When you locate an interior issue, inspect:
-
Directly above it
-
Several feet forward, backward, and to each side
Pay close attention to seams, vents, skylights, and roof edges.
Helpful guide:
How to Inspect Your RV Roof Step by Step
Step 3: Check Common RV Roof Leak Locations
Most RV roof leaks come from a small number of areas:
-
Roof seams (front, rear, and sides)
-
Vents and skylights
-
AC unit bases
-
Antennas and mounts
-
Roof edge trim
Cracked, lifted, or brittle sealant is a common culprit.
Step 4: Look for Surface Clues on the Roof
As you inspect, watch for:
-
Bubbling or blistering in the roof membrane
-
Discoloration or dark patches
-
Soft or spongy spots underfoot
These signs often point to moisture trapped beneath the surface.
Related reading:
What Causes RV Roof Bubbles and Blisters?
Step 5: Perform a Controlled Hose Test
If visual inspection doesn’t reveal the leak, a controlled water test can help pinpoint it.
Key rules:
-
Start low and work upward
-
Test one section at a time
-
Spray gently, not aggressively
-
Wait several minutes between sections
Have someone inside watching closely for moisture.
Step 6: Watch for Delayed Leaks
Some leaks don’t appear immediately.
After spraying an area:
-
Stop the water
-
Wait 5–10 minutes
-
Recheck the interior
Delayed leaks are common when water travels through insulation or framing.
Step 7: Inspect Sealant Condition Closely
Even if sealant looks intact at first glance, look closer for:
-
Hairline cracks
-
Shrinking or pulling away from surfaces
-
Sealant that feels brittle instead of flexible
Sealant failure is one of the most common leak causes.
Step 8: Rule Out Condensation vs. Leaks
Not all moisture is caused by leaks.
Condensation is more likely if:
-
Moisture appears in cold weather
-
Windows fog heavily
-
Water forms evenly rather than dripping
True leaks usually worsen after rain or washing.
Step 9: Document Everything
Take photos and notes of:
-
Interior damage
-
Roof problem areas
-
Test results
This helps you track changes over time and avoid repeating repairs in the wrong place.
When to Seek Professional Help
Consider professional inspection if:
-
Leaks keep returning
-
You find large soft areas
-
Structural sagging is present
-
Multiple leak points appear
Some leaks require pressure testing or membrane repair beyond DIY scope.
Final Thoughts
Diagnosing RV roof leaks takes patience, not guesswork. Rushing repairs or sealing random areas often leads to repeat leaks and more damage.
A methodical approach helps you:
-
Find the true source
-
Prevent hidden water damage
-
Make repairs that actually last
Careful diagnosis always saves time and money in the long run.