If your RV roof feels soft, spongy, or bouncy underfoot, it’s not something to ignore. A soft RV roof almost always means water damage beneath the surface, and the longer it goes unaddressed, the worse (and more expensive) the repair becomes.
This guide explains what a soft RV roof means, why it happens, and what steps to take immediately to limit further damage.
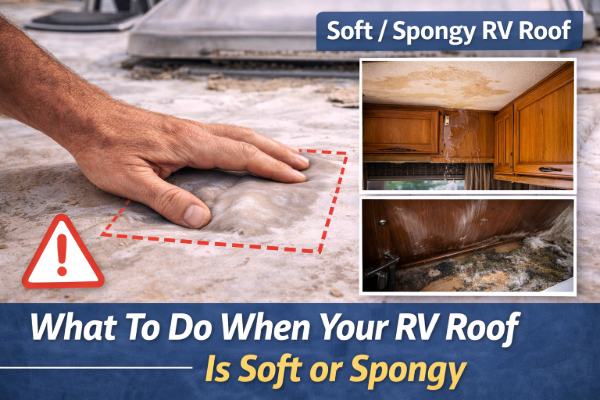
What Does a Soft or Spongy RV Roof Mean?
A soft RV roof usually indicates that moisture has soaked into:
-
Roof decking
-
Insulation
-
Adhesive layers
Even if the roof membrane looks intact, water may be trapped underneath, weakening the structure from the inside.
Related reading:
Signs of Hidden RV Roof Water Damage
Is a Soft RV Roof an Emergency?
Not always an emergency — but it is urgent.
A soft roof can:
-
Spread quickly as moisture moves
-
Lead to mold growth
-
Cause structural failure if ignored
-
Turn a small repair into a full roof replacement
The key is acting early.
Step 1: Stop Walking on the Soft Area
As soon as you notice softness:
-
Avoid stepping on it
-
Don’t place weight or tools there
-
Mark the area visually if needed
Walking on a soft roof can crack the membrane and worsen the damage.
Step 2: Identify the Size of the Soft Area
Carefully test the surrounding roof by gently pressing with your hand or foot.
Determine:
-
Is the softness localized or widespread?
-
Does it feel springy or fully compressed?
-
Are there multiple soft spots?
Small, localized softness may be repairable. Large areas often indicate structural damage.
Step 3: Inspect the Interior Below the Soft Spot
Go inside the RV and inspect directly below the affected area.
Look for:
-
Ceiling stains
-
Warping or bubbling panels
-
Musty or moldy odors
-
Damp cabinets or trim
Interior signs confirm active or past water intrusion.
Step 4: Find the Source of the Water
A soft roof is a symptom — the real problem is the leak.
Common leak sources include:
-
Roof seams
-
Vents and skylights
-
AC unit bases
-
Roof edge trim
-
Antennas or mounts
Use a slow, methodical inspection approach.
Diagnosis guide:
How to Diagnose RV Roof Leaks
Step 5: Perform a Controlled Leak Test
If the leak source isn’t obvious, a controlled hose test can help.
Key rules:
-
Start low and work upward
-
Test one section at a time
-
Spray gently
-
Wait for delayed leaks
Step 6: Do NOT Seal Over a Soft Roof
One of the biggest mistakes is sealing over a soft or spongy area.
Why this makes things worse:
-
Traps moisture underneath
-
Accelerates rot and mold
-
Hides damage until it spreads
This is a common beginner error.
Step 7: Decide Between DIY Repair or Professional Help
DIY Repair May Be Possible If:
-
Softness is small and localized
-
Roof decking is mostly intact
-
You’ve clearly identified the leak
-
You’re comfortable with minor structural work
Hire a Professional If:
-
The soft area is large
-
The roof feels saggy
-
Multiple soft spots exist
-
Water damage is extensive
Decision guide:
DIY RV Roof Repair vs Hiring a Professional: What’s Worth It?
Step 8: Temporary Protection (If Immediate Repair Isn’t Possible)
If repairs must wait:
-
Keep the RV covered or under shelter
-
Avoid rain exposure
-
Use temporary roof covers only if breathable
-
Monitor humidity inside the RV
Temporary measures buy time but do not fix the problem.
Can a Soft RV Roof Be Repaired?
Yes — but the repair depends on severity.
Minor damage may involve:
-
Removing wet insulation
-
Replacing small decking sections
-
Resealing the roof properly
Severe damage may require:
-
Deck replacement
-
Structural repair
-
Partial or full roof replacement
Early detection always reduces cost and complexity.
How to Prevent a Soft RV Roof
Prevention is far easier than repair.
Best practices include:
-
Inspecting the roof 3–4 times per year
-
Resealing failed sealant promptly
-
Cleaning debris regularly
-
Adjusting maintenance based on climate
Maintenance guide:
RV Roof Maintenance Checklist (Printable & Seasonal Guide)
Final Thoughts
A soft or spongy RV roof is one of the clearest warning signs your RV gives you. Ignoring it won’t make it go away — it only allows damage to spread.
Act early, diagnose carefully, and choose the right repair path. Doing so can save your RV roof and thousands in repair costs.