Finding an RV roof leak can be frustrating. Water often travels far from the entry point, making it hard to identify the source. That’s where the hose method comes in.
The hose test is a controlled, step-by-step way to locate roof leaks without waiting for rain. When done correctly, it can pinpoint problem areas before hidden water damage spreads.
What Is the RV Roof Hose Test?
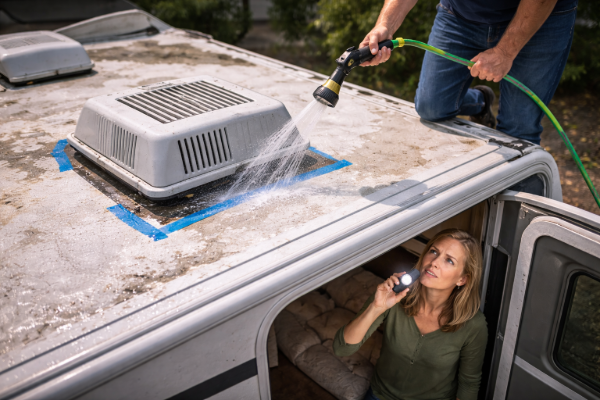
The hose method involves slowly introducing water to specific sections of the RV roof while someone inside watches for leaks. By isolating sections one at a time, you can identify exactly where water is entering.
This method is especially useful when:
-
Leaks appear intermittently
-
Interior stains don’t line up with roof fixtures
-
You suspect multiple leak points
Related reading:
Signs of Hidden RV Roof Water Damage
When to Use the Hose Method
The hose test works best when:
-
Weather is dry and calm
-
Roof sealant is visible and accessible
-
You can safely access the roof
Avoid performing this test during heavy wind, freezing temperatures, or extreme heat.
What You’ll Need
-
Garden hose with adjustable nozzle
-
A helper inside the RV
-
Ladder and non-slip shoes
-
Towels or paper towels
-
Flashlight
Optional but helpful:
-
Notebook or phone for notes
-
Painter’s tape to mark suspect areas
Step 1: Prepare the RV
Before testing:
-
Empty overhead cabinets near the ceiling
-
Remove ceiling vents or light covers if possible
-
Place paper towels under suspect areas
-
Close all windows and doors
This makes small leaks easier to spot.
Helpful guide:
How to Inspect Your RV Roof Step by Step
Step 2: Start Low and Work Up
This is the most important rule of the hose method.
Why it matters
Water flows downward. If you start at the top, you won’t know where the leak originated.
How to do it
Begin spraying low on the RV, such as:
-
Sidewall seams
-
Windows
-
Clearance lights
Wait several minutes before moving upward.
Step 3: Test One Section at a Time
Move slowly and isolate areas such as:
-
Roof edges
-
Front and rear seams
-
Vents and skylights
-
AC unit base
-
Antennas and mounts
Spray each section for 2 to 5 minutes, then pause and wait.
Your helper inside should watch for:
-
Drips
-
Dampness
-
Ceiling discoloration
-
Moisture trails
Step 4: Watch for Delayed Leaks
Not all leaks appear immediately. Some take time to travel through insulation or roof layers.
After each spray section:
-
Stop the water
-
Wait several minutes
-
Check again with a flashlight
This step helps identify slow leaks.
Step 5: Mark and Document Leak Locations
Once a leak appears:
-
Stop spraying
-
Mark the exterior location with tape
-
Take photos if possible
This prevents confusion later and helps with accurate repairs.
Related article:
Common RV Roof Repair Mistakes to Avoid
Step 6: Inspect the Roof After Testing
After completing the test:
-
Allow the roof to dry
-
Inspect sealant near marked areas
-
Look for cracks, gaps, or lifted sealant
Recurring leaks often point to deeper issues such as membrane separation or hidden moisture damage.
Related reading:
What Causes RV Roof Bubbles and Blisters?
Common Hose Test Mistakes to Avoid
-
Spraying too aggressively
-
Rushing between sections
-
Testing multiple areas at once
-
Ignoring delayed leaks
-
Performing the test alone
The hose method works best when done slowly and methodically.
What If You Can’t Find the Leak?
If no leak appears:
-
The issue may be condensation
-
Water may be entering during driving rain
-
Damage may already be internal
At this point, professional inspection or pressure testing may be needed.
Final Thoughts
The hose method is one of the most effective DIY ways to locate RV roof leaks. When done correctly, it saves time, prevents guesswork, and helps you repair the actual problem instead of chasing symptoms.
Regular testing, especially after storms or seasonal changes, can protect your RV from costly hidden damage.