Maintaining the integrity of your RV’s roof is crucial for preventing leaks, water damage, and costly repairs. Regularly inspecting and resealing your RV roof ensures its longevity and keeps your vehicle in optimal condition. Here’s a comprehensive guide on how to inspect and reseal your RV roof, emphasizing the importance of this maintenance task.
Why It’s Important to Inspect and Reseal Your RV Roof
Your RV’s roof is constantly exposed to various environmental elements—sun, rain, wind, and debris—all of which can cause wear and tear over time. Neglecting regular maintenance can lead to:
-
Leaks and Water Damage: Even small cracks or deteriorated sealant can allow water to seep in, leading to mold growth, structural damage, and costly repairs.
-
Reduced Lifespan: Without proper care, the roofing material can degrade faster, shortening the overall lifespan of your RV.
-
Decreased Resale Value: An RV with a well-maintained roof retains its value better than one with evident neglect.
Step 1: Inspect Your RV Roof
Regular inspections are the first line of defense against potential issues. It’s recommended to inspect your RV roof at least twice a year, preferably in the spring and fall. Additionally, inspect the roof after exposure to harsh weather conditions such as heavy rain, snow, or extreme heat.
What to Look For:
-
Cracks or Tears: Examine the roofing material for any visible cracks, tears, or punctures that could allow water ingress.
-
Sealant Condition: Check the sealant around vents, skylights, seams, and other roof components. Look for signs of deterioration, such as cracking, peeling, or gaps.
-
Soft Spots or Discoloration: These may indicate underlying water damage or mold growth.
-
Debris Buildup: Leaves, branches, and other debris can trap moisture and cause damage over time.
Safety Tips:
-
Use Caution: Always ensure you have a stable ladder and, if possible, have someone assist you.
-
Avoid Fragile Areas: Do not step on vents, skylights, or other delicate components.
Step 2: Clean the Roof Before Resealing
A clean surface is essential for effective resealing. Dirt, debris, and oxidation can prevent sealants from adhering properly.
Cleaning Process:
-
Choose the Right Cleaner: Select a cleaner compatible with your roof material. For rubber roofs, specialized cleaners like Thetford’s Premium RV Rubber Roof Cleaner & Conditioner are effective.
-
Gather Supplies: You’ll need a soft-bristle brush, a bucket, and a hose.
-
Rinse the Roof: Start by rinsing off loose debris with water.
-
Apply Cleaner: Following the manufacturer’s instructions, apply the cleaner to a small section of the roof.
-
Scrub Gently: Use the soft-bristle brush to scrub the area, removing dirt and stains.
-
Rinse Thoroughly: Ensure all cleaning residue is washed away.
-
Dry the Roof: Allow the roof to dry completely before proceeding with resealing.
Safety Precautions:
-
Avoid Slips: Be cautious, as the roof may become slippery when wet.
-
Protect the Sides: Prevent cleaning solutions from streaking the RV’s sides by rinsing them promptly.
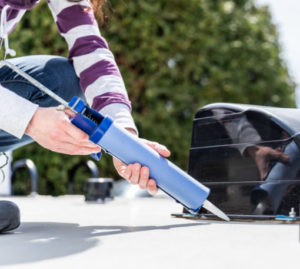
Step 3: Apply a High-Quality RV Roof Sealant
Once the roof is clean and dry, it’s time to apply sealant to areas that need attention.
Choosing the Right Sealant:
-
Dicor Self-Leveling Lap Sealant: Ideal for EPDM and TPO roofs, this sealant spreads evenly and provides a durable, waterproof barrier.
-
EternaBond RoofSeal Sealant Tape: Perfect for sealing seams and repairing minor damage, this tape offers a long-lasting solution.
-
Flex Seal Liquid Rubber Sealant Coating: This liquid rubber provides an extra layer of protection, making it suitable for coating the entire roof.
Application Steps:
-
Prepare the Sealant: Read and follow the manufacturer’s instructions carefully.
-
Target Problem Areas: Apply the sealant to cracks, seams, and around roof components like vents and skylights.
-
Ensure Coverage: For larger areas or seams, products like EternaBond tape can provide comprehensive coverage.
-
Allow to Cure: Let the sealant cure as per the manufacturer’s guidelines before exposing it to weather conditions.
Step 4: Final Inspection and Maintenance Tips
After resealing, conduct a final inspection to ensure all areas have been adequately addressed.
Ongoing Maintenance:
-
Regular Checks: Perform routine inspections every few months, especially after significant weather events.
-
Clean Routinely: Keep the roof free from debris to prevent damage and maintain the effectiveness of the sealant.
-
Reapply Sealant as Needed: Over time, sealants may degrade. Reapply as necessary to maintain a watertight seal.
-
Consider Roof Protectants: Using a UV-resistant roof protectant can further extend the life of your roof by preventing sun damage.
Conclusion
Regularly inspect and reseal your RV roof is a vital aspect of RV maintenance. By dedicating time to these tasks, you can prevent leaks, avoid costly repairs, and extend the lifespan of your vehicle. Utilizing high-quality cleaning and sealing products ensures your RV remains protected against the elements, allowing you to enjoy your adventures with peace
1 thought on “How To Inspect And Reseal Your RV Roof”
Comments are closed.